Do you hear the click-click-click of your dog’s nails when they walk across the floor? That’s a sure sign that you need to trim your dog’s nails.
Trimming nails is often a struggle for many dog parents. If you have a dog that already hates having their nails trimmed you will need to take a little different approach. This is where cooperative care comes into play… and why it is so important. The truth is, whether or not your dog likes having their nails trimmed, it’s a task that still needs to be done. Nail trims are an important part of keeping your dog both happy and healthy.
For dogs that have already developed sensitivities to husbandry care – such as nail trims – cooperative care reframes these procedures allowing your dog to develop more positive experiences. So, until I can write more about cooperative care techniques for nail trims… check out these Fear Free friendly tips for trimming a dog’s nails.
If your dog doesn’t have issues with having their nails trimmed and you just want to learn how to do it yourself… you’re in the right place.
RECOMMENDED ARTICLE: CANINE COOPERATIVE CARE: GIVING YOUR DOG A CHOICE
WHAT HAPPENS IF MY DOG’S NAILS GET TOO LONG?
It may be surprising to you to learn that nails that are kept too long can pose a number of both short and long term negative consequences for your dog.
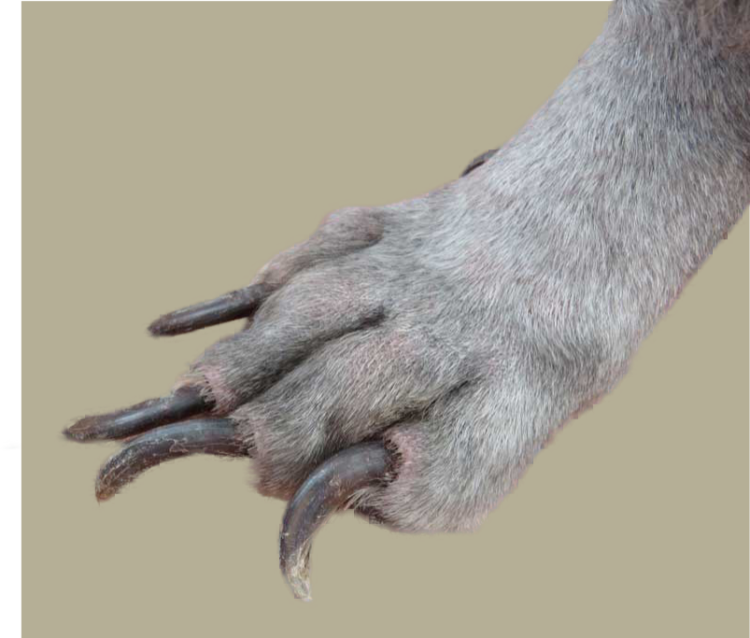
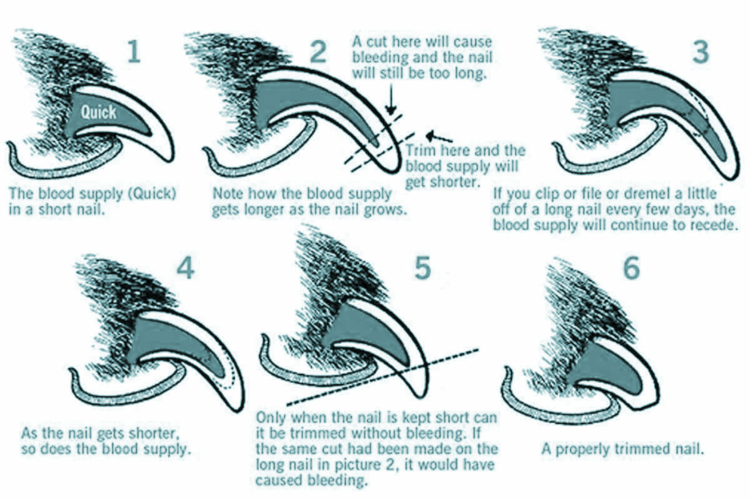
Letting your dog’s nails grow too long allows the “quick” of their nail to continue to grow as well. As the quick grows it becomes increasingly more difficult to keep your dog’s nails at an appropriate length. When your dog has nails that are too long, each step they take can cause them pain. The nail pushes up into the nail bed forcing the toes to twist to the side. Not only is this painful, but long term this can lead to arthritis, and nobody wants that. Nails, if left, can actually grow long enough that they curl and grow back into the pads of your dog’s feet which is very painful and can lead to infections. I have seen this a number of times with dog’s dewclaws.
Your dog’s foot contains a number of proprioceptive receptors. These provide information to your dog’s central nervous system about where their body is in relation to the ground. When your dog has long nails, their brain actually thinks they are walking up a hill. When we walk up a hill our body compensates… a dog is no different… their body’s posture changes to compensate. They lean forward over their front legs, but since there isn’t a hill – the brain only thinks there is a hill – their hind limbs also compensate to keep them from falling forward and doing a face plant. This posture, which is compensating because of the long nails, takes a toll on your dog’s body and predisposes him to chronic pain and injuries.
WHAT IS A QUICK? WHAT HAPPENS IF I CUT IT?
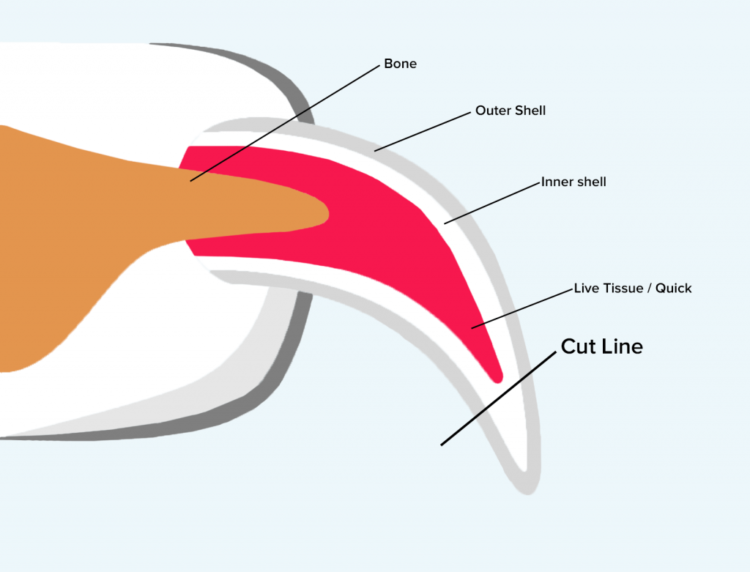
The “quick” is the center portion of your dog’s nail which contains both blood vessels and nerves. When trimming the nail it’s important not to clip past the nail’s natural curve as this is where the “quick” starts. If you accidentally cut the quick it will likely bleed and cause your dog some pain.
Cutting the quick can happen very easily. Maybe your dog moved… or the lighting wasn’t the best… whatever the reason, even professional groomers cut the quick sometimes. If you’ve done it, forgive yourself! However, in saying that, because it does cause your dog pain you really want to do your best to avoid it! Dogs can easily learn to associate pain with getting their nails trimmed… this is why some dogs hate this procedure so much.
If you happen to cut the quick, styptic powder (I use Kwik Stop) is the best thing to help the blood clot and stop the nail from bleeding. If you don’t have styptic powder on hand you can also use cornstarch, baking powder or flour.
To apply:
- Place a small amount of styptic powder on the tip of your finger and press the powder on to the tip of the nail.
- Apply pressure for about 30 seconds to allow the styptic powder to stick.
If the nail is still bleeding after a couple of minutes, go through the process again. This should end the bleeding, but if it doesn’t stop after several minutes, call your veterinarian for advice.
Generally, if you’re concerned that you may be cutting too close to the quick, you’re better to leave the nail a little longer.
WHAT EQUIPMENT DO I NEED TO CUT MY DOG’S NAILS?
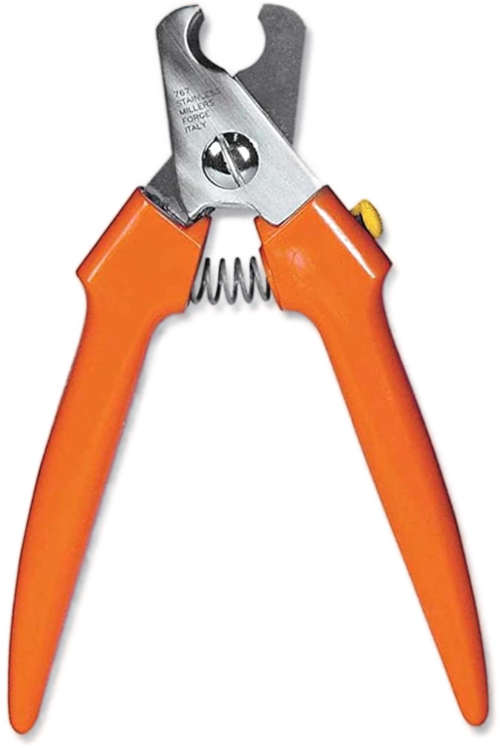
There are a number of options available to allow you to trim your dog’s nails. The plier and scissor style nail clippers are what most veterinary professionals use. As a groomer, these styles are my preference as well as they are very effective for dogs with thick, tough nails. Whatever you use ensure they are sharp so they are cutting and not crushing the nail.
As discussed above, it is a good idea to have styptic powder, or a substitute on hand for those times where you accidentally cut your dog’s nail too short. It happens! Be prepared.
As well, having treats nearby for your dog allows you to use positive reinforcement – giving your dog treats during and after the procedure – to help to make nail trims a positive experience. Once you are finished, give them an extra special treat or a fun game with their favorite human!
TYPES OF CLIPPERS & NAIL GRINDERS
- Guillotine style clippers have a stationary blade (located in the hole you put the nail through) and another blade which moves (the “guillotine”) and slices the nail when you squeeze the handles of the clippers. These are better for smaller dogs with nails that are thinner as they aren’t powerful enough to cut through the thicker nails of larger dogs.
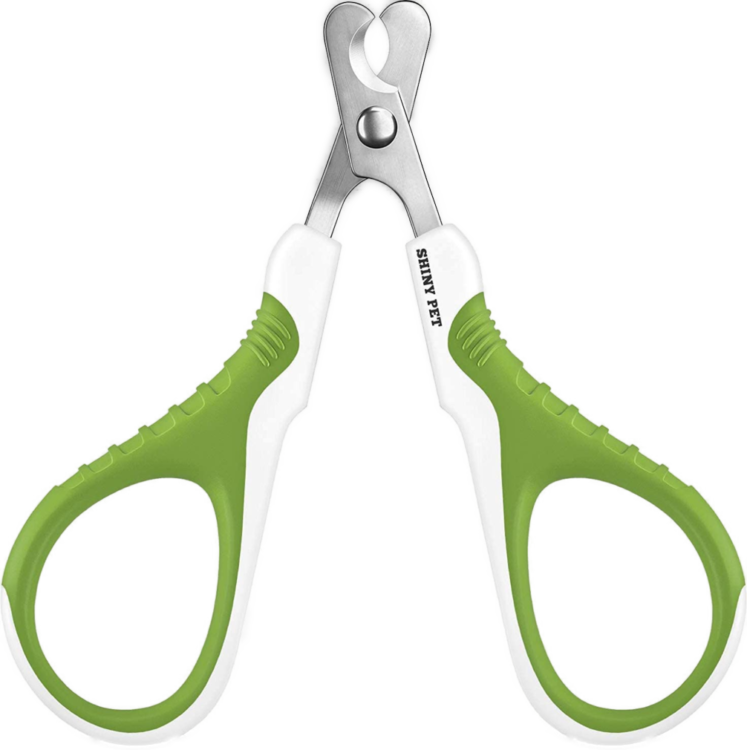
- Scissors style clippers look and work like small scissors. You place the nail in the divots that are toward the end of each blade and cut. Some may find these easier to hold and use, but they are generally better for small dogs and puppies with nails that are thinner.
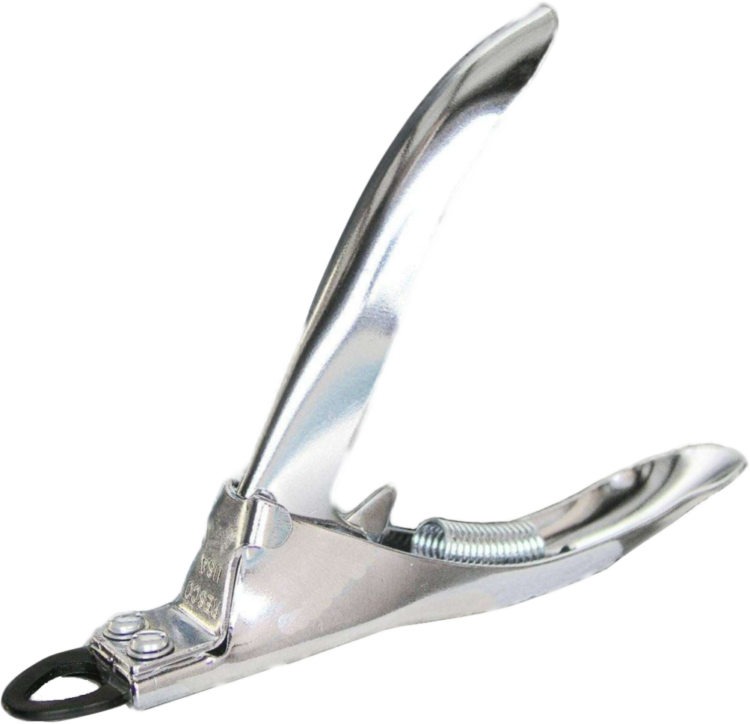
- Plier style clippers come in a few different looks, but they all have a spring which makes them stronger and better for large, thick nails. Some designs also have a guard on their clippers that help ensure that you don’t accidentally cut the nail too short.
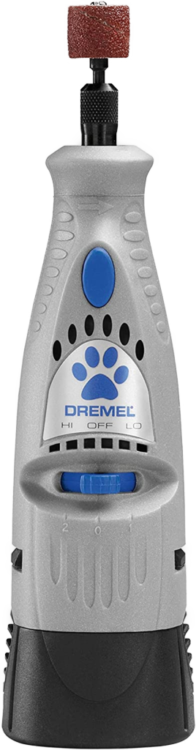
- Nail grinders – which you may think of when you hear the name Dremel – are very different than clippers. Instead of cutting the nail they file the nail down with a grinding head which has sandpaper on it. This leads to a smoother and more even result… and also makes it easier to avoid hitting the dog’s quick.
HOW TO CUT DOG NAILS: STEP-BY-STEP INSTRUCTIONS
Ensure that you have all the equipment and supplies you need before starting.
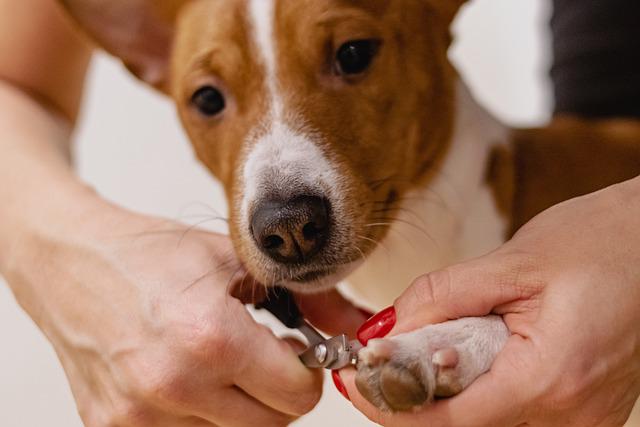
1. POSITION YOURSELF & PICK UP YOUR DOG’S PAW

You can trim your dog’s nails, holding your dog’s paw, while you are face to face with your dog… but it is often easier for dog parents to be positioned beside your dog. If you’re right handed, you will position yourself on the right side of your dog, holding their paw with your left hand. It is important to ensure that you are holding the paw and leg in a natural position for your dog so you don’t hurt them.
I actually prefer to position myself behind the dog and flip their paw backward so that you are looking at the bottom of the foot. It provides me with the best view of the nail and what I am doing, while also keeping the dog’s leg in a natural position.
2. SEPARATE THE INDIVIDUAL TOE
Firmly, but gently, hold your dog’s paw – in whichever manner you have found comfortable for you both. If you have a dog with furry feet you may need to trim the hair, or at least push it out of the way, so that you can see what you are doing.
Using your thumb and forefinger, hold the toe of the nail that you are going to start with. Place your forefinger on the toe’s pad and your thumb on the top of the toe. Next, gently push your forefinger up and backward on your dog’s pad while at the same time push your thumb forward. This extends the nail away from the foot making it easier to cut.
3. DETERMINE WHERE YOU ARE GOING TO CUT
When you trim your dog’s nails, the goal is to cut the nail as short as possible without making it bleed. Avoid clipping past the natural curve of the nail.
White nails are much easier to cut than dark nails. For white nails, avoid cutting the pink part – that is the quick. When trimming dark nails go slow and only cut off a little bit at a time. As you get near the quick you will notice a chalky white ring… when you see a tiny black dot in the middle of that white ring – STOP! That black spot is the end of the quick.
4. CUT THE NAIL AT A 45° ANGLE – TRIMMING A LITTLE AT A TIME
When your dog’s nail is cut, the edge should be parallel to the floor. To accomplish this, cut the nail at a 45° angle rather than straight across. Remember, it’s best to go slow and only cut a little at a time instead of cutting off too much at once and making the nail bleed.
6. REMEMBER THE DEWCLAWS!
Most dogs have dewclaws. These are located on the inside of their front legs, a little further up than the rest of your dog’s toes. Some dogs, like Great Pyrenees and other guardian breeds, have double dewclaws… meaning they have them on their front and hind legs. So check your dog to be sure.
7. REWARD YOUR DOG
Positive reinforcement is one of the fastest and most effective ways for a dog to learn. Rewarding your dog after a nail trim (and during) creates a positive association for your dog.
HOW OFTEN SHOULD I CUT MY DOG’S NAILS?
This really varies from dog to dog, based on lifestyle, but a good rule of thumb is to trim your dog’s nails once every month. Dogs that walk frequently on pavement and concrete may not need nails trimmed as often as a dog who spends most of their time indoors or on grassy surfaces. The goal is to determine how often you need to trim your dog’s nails in order to ensure that the nail is not touching the ground… then that is your schedule.
AN ALTERNATIVE TO NAIL CLIPPERS: THE NAIL GRINDER
As an alternative to trim your dog’s nails, you may choose to use a nail grinder that is specifically designed for pet nails. When using a nail grinder only grind a small part of your dog’s nail at a time. Use short strokes, keep the grinder moving, and keep a close eye on the nail for the quick (pink dot on white nails and black dot on dark nails) to avoid grinding down too far.
If your dog has long hair, to avoid the hair getting caught up in the nail grinder, be sure to trim the hair around the toes prior to using the grinder.
For maintenance purposes, unlike when using nail clippers, you can probably use the nail grinder on your dog’s nails every 7-10 days.
If you are someone that is more visual I will share a couple of videos with different examples of how to handle the dog during a nail trim… and they show both white an dark nails and do a pretty job of close up view so that you can see what to look for with respect to avoiding cutting the quick.
In the end, if you feel uncomfortable clipping your dog’s nails, schedule a nail trim appointment with your veterinarian, groomer or local pet store that offers the service. For your dog’s health, it’s important that, even if you aren’t comfortable with this procedure, that it is still getting done.


0 Comments
Trackbacks/Pingbacks